In this step by step guide, I will show you how to permanently replace Microsoft Notepad on Windows XP with the Professional Notepad.
You can keep your web browser open while following these instructions. Just make sure that Notepad is not running.
I have tried to keep these instructions as simple as possible, so that anybody can follow them.
Note that it is important to follow these instructions exactly. If I say that you need to overwrite Notepad, then you should do so. Otherwise, I cannot guarantee that these instructions will have the proper effect.
If you would ever like to restore plain old Notepad.exe, you will need to make a backup copy first. Without the backup copy, you will have no easy way of restoring the original Notepad.
Find Notepad.exe in the C:\WINDOWS folder using Windows Explorer. Right-click on it, and select copy from the context menu.
Then open another directory in Windows Explorer, and select Paste from the context menu. Windows will now place a copy of Notepad.exe into the new location.
Important: It is important that you copy Notepad, and do not move it. Leave the original Notepad in place, so we can overwrite it later.
Windows XP has a feature that protects vital system files from being modified. Notepad is considered a vital system file. Therefore, we must first overwrite the hidden backup copy of Notepad with our Professional Notepad in disguise. The hidden backup copies of the vital system files are kept in a secret DllCache folder. We will first change some settings to make it visible. (If you wondered why a naked Windows XP installation takes so much disk space, that's because almost everything is installed twice. One copy that you'll actually use, and one copy for backup.)
Step 1: Select Tools|Folder Options from the menu
Step 2: Turn ON "show hidden files and folders" and turn OFF "hide protected operating system files"
In the Folder Options screen that appears, turn ON "show hidden files and folders". Then turn OFF "hide protected operating system files". You may need to scroll down the list of options to see these two options. Windows will then ask you if you really want to turn off the option to hide protected files. Click on Yes. You can leave all other options as they are. Press OK to close the screen after changing options as needed.
Step 3: Find Professional Notepad
By default, it is installed into C:\Program Files\A Tech Group\Professional Notepad. If the option to hide extensions of known file types is activated on your computer (it is by default), then the file will appear as "Notepad" instead of "Notepad.exe".
Step 4: Copy Notepad.exe
Right-click on Notepad.exe and pick Copy from the context menu.
Step 5: Paste Notepad.exe into C:\Windows\System32\dllcache
Use the folders pane in Windows Explorer to navigate to the C:\Windows\System32\dllcache folder. Then right-click in the empty space of the right hand pane listing all the files in the dllcache folder. In the context menu, select Paste.
Step 6: Confirm to replace Notepad.exe
Windows will now ask if you are sure you want to replace Notepad. Click Yes.
Step 7: Copy the new Notepad.exe
Right-click on the new Notepad.exe that you just pasted into the dllcache folder, and select Copy from the context menu.
Step 8: Paste Notepad.exe into the Windows folder
Navigate to the C:\Windows folder. Right-click in the empty space of the right hand pane and select Paste from the context menu. Windows will again ask you to confirm. Just click Yes.
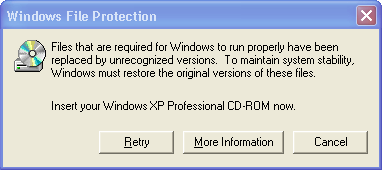
Step 9: Tell the Windows File Protection to get lost
Windows will now detect that you have just replaced one of it's "vital system files" (he he). It will then notice that the copy in the dllcache folder has also been tampered with! So Windows will ask you to insert your original Windows CD into your computer, so it can restore plain old Notepad. Do not insert the CD. Just click Cancel. Windows will insist, but click Cancel again and Windows will stop complaining.
Step 10: Copy the new Notepad.exe and Paste it into C:\Windows\System32 folder
Turn "hide protected operating system files" back on
To prevent bad mistakes, it is a good idea to turn on the option to hide protected system files. Tampering with some of those files can really make your computer stop working, so it is best to hide them so nobody can mess with them by accident. Pick Tools|Folder Options from the menu in Windows Explorer, and activate "hide protected operating system files" again.